


Flamedragon Tyrant is one of Kingshot’s largest alliance battles. The central Palace works much like Castle Battle, while the Pyrocrystal system and side objectives add the map control of Eternity’s Reach. Raw power matters, but alliances can still lose ground through poor registration, scattered rallies, wasted Crystal Skills, and careless healing.
This guide explains what to prepare, which objectives matter, and how rally leaders, support players, and free-to-play governors can contribute without burning resources for little return.


How the Flamedragon Tyrant Event Works
Flamedragon Tyrant has five main phases:
- Alliance Sign-Up: Alliances register, and only the highest-ranked ones in the Zone qualify.
- Combatant Dispatch: R4 and R5 can select up to 60 eligible governors. Players must join the alliance before sign-up ends.
- Champion’s Eve: Complete training and gathering tasks to unlock healing speed and cost bonuses. Do not waste all your saved speedups here.
- Battle Phase: Players enter early to position themselves. The Palace opens one hour after the battlefield opens and remains contested for six hours.
- Rearmament: Participating kingdoms receive major healing speed and cost bonuses after the Palace battle.
The governor with the longest Palace occupation time becomes the Flamedragon Tyrant. Only the rally captain earns occupation time, so alliances should choose Palace rally leaders carefully.
Compare regular in-game prices with current Mone prices to find the right Kingshot pack for your budget. The popular $4.99 pack currently offers the largest discount. Prices and discounts may change. The current price is always shown on the product page and again before payment.
Prepare Your Alliance Before Battle
Flamedragon Tyrant is too crowded for players to choose targets independently. Before entering, leadership should divide the 60 combatants into clear groups:
- Palace rally leaders and backup captains
- Palace rally joiners
- Aerie teams
- Pyrocrystal and Dragonborn Escort hunters
- Mobile support players for healing and reinforcement
Rally leaders should prepare their strongest combat march and confirm the required troop ratio. Joiners should save the correct formation in advance instead of sending whatever heroes are available when a rally appears.
Stock advanced teleports, healing speedups, resources, and march speed items. Players assigned to the center should be online before the Palace unlocks, because good positions inside the Magma Sanctum disappear quickly.
Lower-power players are usually safer in the Border Region, where shields remain available. Moving into the Magma Sanctum removes your shield and leaves your Town open to attack.
Do not assume every qualified player must spend the full battle beside the Palace. A weaker account can contribute more by gathering Pyrocrystals consistently than by being repeatedly removed from the center.
Control the Palace, Aeries, and Pyrocrystals
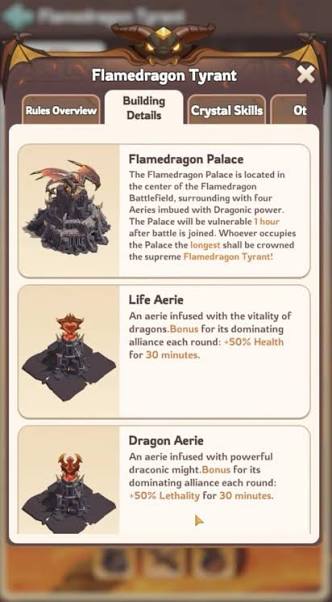
Flamedragon Palace
The Palace is the main objective. Occupation time determines alliance rankings, while the governor with the longest personal occupation becomes the Flamedragon Tyrant.
Aeries
Four Aeries surround the Palace, each providing a 50% bonus to one stat:
- Health
- Lethality
- Defense
- Attack
Each Aerie has 30 minutes of battle, followed by 30 minutes of protection. The alliance with the longest occupation receives its bonus during the protected period.
Use Aerie buffs to support major Palace pushes. Smaller alliances should focus on one useful Aerie instead of spreading their strongest players across all four.
Pyrocrystals
Pyrocrystals are used to activate Alliance Crystal Skills. They can be obtained from:
- Dragonborn Escorts: Appear when the Palace opens and refresh every 30 minutes.
- Pyrocrystal Mines: Appear 15 minutes later and refresh every 30 minutes.
Both activities provide personal points and Alliance Pyrocrystals. When Level 2 mines are heavily contested, gathering safer Level 1 mines is often more efficient.
Best Battle Strategy for Every Role
Rally Leaders
Lead Palace rallies with the strongest available stats, because only the captain receives occupation time. Keep backup captains ready so the alliance can continue launching when the main leader is healing, displaced, or temporarily offline.
Do not send every rally as soon as it fills. Time major attacks around Aerie bonuses and active Crystal Skills. A coordinated burst has a much better chance of breaking a strong garrison than several isolated rallies.
R4 and R5 Officers
Only R4 and R5 members from participating alliances can activate Alliance Crystal Skills. The most useful skills for a Palace fight are generally those that strengthen defenders, increase rally capacity, or reduce healing pressure after combat.
Dragonblood Healing, Dragonscale Armor, and Dragonroar Rally are strong choices when your alliance is pushing or defending the center. Multiple Crystal Skills can run together because each skill has its own cooldown.
Save enough Pyrocrystals for an important Palace window instead of spending everything on minor gathering boosts. A late coordinated push can work especially well after other alliances have exhausted troops, teleports, and attention.
Leadership should also assign one officer to watch Escort and mine refresh timers. Without a dedicated caller, hundreds of players may begin searching only after the best targets have already disappeared.
F2P and Lower-Power Players
Do not measure success only by Palace occupation. Your practical targets are personal milestones, useful Pyrocrystal income, and reliable rally support.
Hunt Dragonborn Escorts as soon as their refresh timer appears. Gather mines from safer parts of the Border Region. Support Palace and Aerie rallies, then heal in small batches to make full use of Alliance Help.
Healing Rules and Mistakes to Avoid
Manage Your Infirmary
Your infirmary has unlimited capacity inside the battlefield, but healing still costs resources and time. Palace and Aerie battles only cause injuries, while attacks against enemy Towns may also result in troop deaths.
After leaving the battlefield, your normal infirmary limit returns. Existing troops above that limit remain in overflow and do not die immediately. However, until your injured troop count falls below the normal limit, any newly severely injured troops from battles outside the Flamedragon battlefield will die immediately.
After the event, participating kingdoms receive 500% Healing Speed and 30% lower Healing Cost. Avoid other battles after leaving the battlefield, then use the Rearmament bonuses to clear your injured troops.
Common Mistakes
- Arriving too late to secure a good Palace position
- Letting unsuitable players lead Palace rallies
- Using Crystal Skills without a coordinated push
- Sending the wrong heroes or troop ratios
- Spending all speedups during Champion’s Eve
- Attacking Towns only to earn points
Town attacks can disrupt enemy positions, but they give no personal event points or resource loot. Use them only as part of an alliance strategy.
Rewards and Predictions
Complete Blazing Trail daily and season missions to earn:
- Dragon Essence: Used in the Dragon’s Caravan.
- Dragonclaw Marks: Used for predictions and the Prediction Shop.
In Tyrant Prediction, you can spend 1,000 Dragonclaw Marks on each alliance, with up to three selections. Championship Prediction offers free questions that reward 1,000 Marks for each correct answer.
Do not choose your own alliance automatically, as predictions provide no battlefield bonus. Compare alliance strength, kingdom progress, and current voting before making your picks.
For most players, the best approach is to clear reachable personal milestones, gather Pyrocrystals, complete missions, and avoid overspending for an unrealistic leaderboard rank.
Final Thoughts
Flamedragon Tyrant rewards clear roles and coordinated timing. Secure useful Aeries, collect Pyrocrystals, save Crystal Skills for major Palace pushes, and manage healing carefully.
For a convenient and secure Kingshot top-up before the event, Mone can help you prepare the resources you need.