

The endgame never sleeps, and neither does Whimpering Wastes.
Version 3.5 launched on July 10, 2026, while the current Whimpering Wastes rotation resets on August 3, 2026. With it comes a fresh Whimpering Wastes (WhiWa) rotation that reshapes the meta around new characters, new tokens, and a renewed focus on the Havoc Bane mechanic.
Let's break down exactly what the 3.5 rotation demands, which tokens are worth your limited uses, and how to build for every stage — including the all-important Stages 7 through 11.
Understanding the Core Mechanics
The Ember & Burning Waves Loop
All Respawning Waters stages (7-12) share the same core Environment Report mechanic:
·Dealing damage or defeating enemies fills your Ember gauge
·Once Ember caps, you enter the Burning Waves state for 30 seconds
·During Burning Waves, attacks that hit enemies cause them to take +60% total DMG for 5 seconds
This is your "stop sandbagging, dump your rotation now" window. The entire mode revolves around maximizing damage during these bursts while minimizing downtime between them.
The Token System
Upon starting a challenge, every team must equip a Token, which grants special effects during combat. Completing a challenge consumes one Token use, though some tokens have infinite uses. Both teams in the same challenge can use the same Token if there are enough remaining uses. New Tokens are unlocked the first time a challenge is cleared.
The Mistune Mechanic
When enemies display the Mistune state, hitting them with a Resonator Skill triggers one instance of Tune Break DMG and clears the Mistune state. This rewards clean, intentional ability usage over mindless button-mashing.
3.5 Golden Tokens — The New Meta
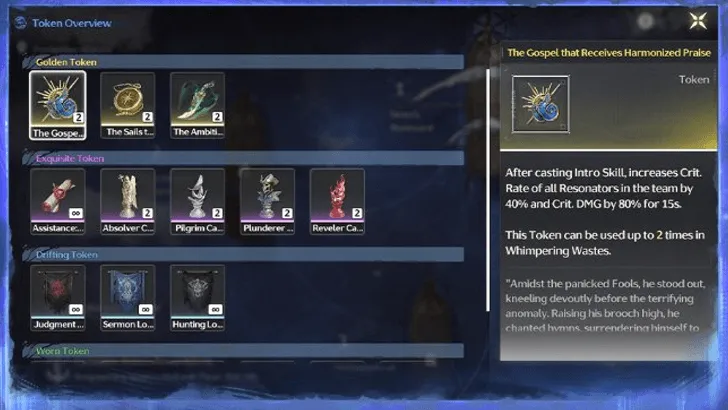
3.5 Golden Tokens
Based on the current rotation, here's what's in the Golden Token pool:
|
Token |
Effect |
Best For |
|
The Mirror Reflecting the Beyond(NEW) |
Resonators deal 60% more total DMG for 15s after inflicting Havoc Bane |
Yangyang: Xuanling teams, any Havoc Bane applicator |
|
The Eye That Gazes into the Abyss |
Enemies take 50% more total Glacio Chafe DMG; inflicting Glacio Chafe increases Glacio DMG by 50% for 5s |
Glacio teams (Suisui, any Glacio DPS) |
|
Whispers of an Undying Grudge |
Total Spectro DMG +20%; Heavy Attack DMG +40%; Basic Attack DMG +40% |
Spectro carries, Heavy Attack-focused DPS |
The Mirror Reflecting the Beyond is the headliner here — and it's tailor-made for Yangyang: Xuanling's kit. Her damage scales with Havoc Bane application (her Basic Attack Stage 4 applies 1 stack of Havoc Bane to targets hit), and this token gives you a massive 15-second damage window every time you apply it. If you're running her in WhiWa, this token is non-negotiable.
The Glacio token sets up nicely for Suisui once Phase 2 drops, and the Spectro/Heavy Attack token is a universal fallback for teams that don't fit the other two.
Purple Tokens — Don't Sleep on These
The purple token pool from previous patches carries over, and some of them are quietly overpowered in the right comps:
·Basic Attack Amplification tokens stack up to 5 times (4% per stack, 15s duration) — massive value for basic attack-heavy carries
·Plunderer + healer strategies remain viable for F2P and low-investment accounts
Stage 7-11 Team Recommendations
Respawning Waters: Chasm (Stages 7-11)is the core monthly reset content, offering 625 Astrite in rewards. All five floors share the same Burning Waves mechanic, making them the most flexible in terms of team building — but that doesn't mean every team works equally well.
The Golden Rule for Stages 9-11
Team-building wise: Stages 7-8 are "play your best two teams" territory with no global elemental resistance penalties. But Stages 9-11 add hard "don't force it" checks:
|
Stage |
Name |
Resistance |
Applies To |
|
Stage 9 |
Riptide |
+20% Spectro RES |
Both halves |
|
Stage 10 |
Tempest |
+20% Aero RES |
Both halves |
|
Stage 11 |
Seabane |
+20% Havoc RES |
Both halves |
If your main carry is one of those elements on that floor, you can still clear — just don't act surprised when the timer feels personal.
Stage 7 – Doomstrand
Strategy:No elemental resistance penalties. Use your two strongest overall teams.
|
First Half |
||
|
Yangyang: Xuanling |
Rebecca |
Verina |
|
Second Half |
||
|
Phrolova |
Cantarella |
Shorekeeper |






Why it works: Yangyang: Xuanling's stance-swapping Havoc damage pairs perfectly with Rebecca's Negative Status application. Verina is widely considered the best support in WhiWa, outclassing Shorekeeper purely because of her significantly smaller rotation — this mode is all about dealing damage, meaning supports need to get as much value as possible in very little time. On the second half, Phrolova's team continues to be one of the strongest for multi-wave content — Phrolova's kit ensures she deals damage even when it's not her turn, while Cantarella and other supports buff her to oblivion.
Token: The Mirror Reflecting the Beyond (First Half) / Whispers of an Undying Grudge (Second Half)
Stage 8 – Whirlpool
Strategy: Still no elemental resistance. Focus on AoE clear speed.
|
First Half |
||
|
Yangyang: Xuanling |
Rebecca |
Verina |
|
Second Half |
||
|
Changli |
Sanhua |
Shorekeeper |




Why it works: Changli is one of the strongest AoE DPS Resonators in Whimpering Wastes, making her a must-have for clearing large groups of enemies quickly. Sanhua provides fast Concerto generation and basic attack amplification, while Shorekeeper offers healing and team-wide Crit buffs. Yangyang: Xuanling continues to dominate the first half with her Havoc Bane synergy.
Token: The Mirror Reflecting the Beyond (First Half) / Whispers of an Undying Grudge (Second Half)
Stage 9 – Riptide (Spectro RES +20%)
Strategy: Avoid Spectro carries. Use Havoc, Fusion, or Glacio teams instead.
|
First Half |
||
|
Yangyang: Xuanling |
Rebecca |
Verina |
|
Second Half |
||
|
Camellya |
|
Shorekeeper |

 Roccia
Why it works: With Spectro RES at +20%, Phoebe and Spectro Rover are off the table. Yangyang: Xuanling thrives here since Havoc isn't penalized. On the second half, Camellya remains a top-tier WhiWa carry. Roccia provides Havoc Sub-DPS support with grouping capabilities that help enormously in endgame modes like Whimpering Wastes and Tower of Adversity. Her Outro Skill provides a unique way to group enemies, which is invaluable for wave clear.
Token:The Mirror Reflecting the Beyond (both halves)
Avoid: Phoebe, Spectro Rover, any Spectro main DPS
Stage 10 – Tempest (Aero RES +20%)
Strategy:Avoid Aero carries. Lean into Fusion, Havoc, or Glacio.
|
First Half |
||
|
Yangyang: Xuanling |
Rebecca |
Verina |
|
Second Half |
||
|
Brant |
Denia |
Lupa |


Why it works: With Aero RES at +20%, Jiyan and other Aero DPS take a big hit. Yangyang: Xuanling continues to shine on the first half. The second half runs a mono-Fusion powerhouse — Brant, Denia, and Lupa all benefit from Fusion synergy, and this team is particularly strong with the right token setup. If you don't have Brant, consider Aemeath Fusion Burst or Hiyuki Hypercarry teams instead.
Token: The Mirror Reflecting the Beyond (First Half) / Whispers of an Undying Grudge (Second Half)
Avoid: Jiyan, Aalto, any Aero main DPS
Stage 11 – Seabane (Havoc RES +20%)
Strategy:Avoid Havoc carries. This is where Suisui and Glacio teams shine.
|
First Half |
||
|
Changli |
Sanhua |
Verina |
|
Second Half |
||
|
Suisui |
Carlotta |
Shorekeeper |


Why it works: With Havoc RES at +20%, Yangyang: Xuanling and Phrolova are heavily penalized. This is the perfect stage for Suisui once she becomes available in Phase 2. Suisui's Glacio support kit amplifies Negative Status teams while offering strong healing and safety. Carlotta serves as the Glacio DPS, and together with Shorekeeper, this team can clear efficiently. On the first half, Changli's Fusion damage isn't penalized, making her the ideal carry here.
Token: The Eye That Gazes into the Abyss (both halves) — this token is tailor-made for this exact matchup
Avoid: Yangyang: Xuanling, Phrolova, Camellya, any Havoc main DPS


F2P / Budget Alternatives
Don't have the shiny new 5-stars? You can still clear most of WhiWa with smart choices:
·Havoc Rover + Yangyang (4-star)— Great AoE and grouping, though avoid Stage 11
·Chixia Hypercarry— Can take advantage of elemental buffs on earlier stages
·Rover (Havoc) + Sanhua Dual DPS— Can take advantage of various DMG boosts
·Baizhi— Strong with tokens that reward healing
·Yuanwu— Solid Electro option for teams needing shields and off-field damage
General tip:You can get like 99% of the rewards at level 80. Don't let the level 100 enemies scare you off.
Infinite Torrents (Stage 12) Guide
This is the final gauntlet — one stage, two halves, and the highest reward tier.
Stage 12 Basic Info
Environment Report:
·Enemies take+30% more total DMG
·Dealing damage or defeating enemies restores Ember
·Burning Waves lasts30swith+60% DMGto enemies hit
·All Tokens have unlimited usesin Infinite Torrents
·Mistune interaction: Resonator Skills trigger Tune Break DMG
Half-Specific Buffs
|
Half |
Buff |
|
1st Half |
Concerto Energy restored to 100% on entry |
|
2nd Half |
Resonance Energy restored to 100% on entry |
Best Teams for Infinite Torrents
The teams that benefit most from the current Golden Token pool are the strongest choices. For this rotation, that means teams leveraging Havoc Bane, Glacio, and Heavy Attack mechanics.
First Half (Concerto Energy Focus)
|
Team |
Token |
|
Yangyang: Xuanling+Rebecca+Verina |
The Mirror Reflecting the Beyond |
|
Yangyang: Xuanling+Rebecca+Chisa |
The Mirror Reflecting the Beyond |
|
Phrolova+Cantarella+Shorekeeper |
Whispers of an Undying Grudge |
Second Half (Resonance Energy Focus)
|
Team |
Token |
|
Galbrena+Qiuyuan+Shorekeeper |
The Eye That Gazes into the Abyss |
|
Suisui+Carlotta+Shorekeeper |
The Eye That Gazes into the Abyss |
|
Brant+Denia+Lupa |
Whispers of an Undying Grudge |
Galbrena + Qiuyuan + Shorekeeper is arguably one of the strongest teams in this rotation — Galbrena is rated SS tier for Whimpering Wastes, and Qiuyuan's buffs amplify her damage significantly.
How to Unlock Whimpering Wastes
Before you can step into the fray, you'll need to meet a few requirements:
·Reach Union Level 30— this is the baseline requirement for most endgame content
·Progress to Rinascita— complete the quest Through The Sea Thou Break to unlock the new region
·Complete "Ocean Is a Soul's Rest"— find Levito in Rinascita and speak to him to start this tutorial quest
Once unlocked, you'll progress through three areas in order: Forbidden Waters(Stages 1-6, one-time clear), Respawning Waters: Chasm(Stages 7-11, monthly reset), and Respawning Waters: Torrents(Stage 12, monthly reset).
Rewards Overview
|
Area |
Astrites |
Type |
|
Forbidden Waters |
800 |
One-time |
|
Respawning Waters: Chasm |
625 |
Monthly |
|
Respawning Waters: Torrents |
175 |
Monthly |
|
Total |
1,600 |
800 one-time + 800 monthly |
For full rewards, aim for 15,000 total points across all Respawning Waters: Chasm stages. In Infinite Torrents, reach 4,500 points for full rewards.
Conclusion
Whimpering Wastes is ultimately a test of adaptability. The 3.5 rotation's Token pool heavily favors Havoc Bane, Glacio, and Heavy Attack compositions — lean into that advantage rather than swimming against the current. Build smart, execute cleanly, and those 1,600 Astrites are yours.
If you are preparing for Yangyang: Xuanling, Suisui, or future Whimpering Wastes rotations, make sure you have enough Astrite before the next banner phase. Mone offers fast and secure Wuthering Waves top-ups, helping you prepare for key Resonators and weapons with less hassle.