


Crazy Joe is one of those Whiteout Survival events that looks easy until you start caring about your score.
You can survive all 20 waves and still finish far behind other players simply because your troops stayed in the wrong city, your reinforcements were poorly distributed, or your alliance used an outdated setup for the HQ waves.
The key to Crazy Joe is not just defending your own city. It is about sending troops out, sharing kills through reinforcements, staying active during the special waves, and adjusting your HQ formation as the difficulty rises.
This Whiteout Survival Crazy Joe guide covers how the event works, the best troop strategy, Waves 7/14/17, HQ Waves 10 and 20, heroes, scoring, rewards, and the changes you need to make at higher difficulties.


What Is Crazy Joe in Whiteout Survival?
Crazy Joe is a recurring Alliance PvE event where Crazy Joe's bandits attack alliance members in consecutive waves.
Each run contains 20 waves.
Most waves target member cities, while two special waves attack the Alliance Headquarters instead.
|
Wave |
Target |
What to Do |
|
1–6 |
Alliance member cities |
Reinforce other members |
|
7 |
Selected online members |
Stay online and reinforce targets |
|
8–9 |
Alliance member cities |
Continue normal reinforcement |
|
10 |
Alliance HQ |
Send the assigned HQ march |
|
11–13 |
Alliance member cities |
Return to city reinforcement |
|
14 |
Selected online members |
Stay online |
|
15–16 |
Alliance member cities |
Continue reinforcing |
|
17 |
Selected online members |
Stay online |
|
18–19 |
Alliance member cities |
Prepare for the final HQ wave |
|
20 |
Alliance HQ |
Send your strongest assigned HQ march |
Crazy Joe is an alliance event, so individual power alone cannot carry the entire run efficiently. A coordinated alliance can usually earn far more total points than a stronger but disorganized alliance.
Another important rule: if your city fails to defend twice, Crazy Joe will stop attacking it for the rest of that run. You can still reinforce other members and continue scoring after your own city drops out.
Compare regular in-game prices with current Mone prices to find the right WOS pack for your budget. The popular $4.99 pack currently offers the largest discount. Prices and discounts may change. The current price is always shown on the product page and again before payment.
Crazy Joe Difficulty Levels in 2026
This is where a lot of older Crazy Joe guides are now outdated.
Older guides commonly list 21 difficulty levels, and some older Whiteout Survival reference pages still show that number.
However, the event has since been expanded in newer States. 2026 player reports and newer event coverage show Crazy Joe extending up to Difficulty 31.
That matters because the strategy that works perfectly at Difficulty 15 or 20 may fail badly at Difficulty 28–31.
At lower difficulties, Joe's armies can die so quickly that Infantry may take nearly all the kills before the other troop types get involved.
At very high difficulties, enemies survive longer. Lancers and especially Marksmen get more opportunities to attack, making late-game troop composition much more important.
Don't Always Pick the Highest Difficulty
A higher Crazy Joe level gives you a larger scoring opportunity, but only if your alliance can actually survive it.
If several cities repeatedly fail or your HQ burns on Wave 20, pushing one level higher may result in fewer useful points than clearing a slightly easier difficulty cleanly.
For an alliance that has just unlocked a new difficulty, try it once and check:
- How many members fail twice
- Whether HQ Wave 20 reaches a full clear
- Which troop type is getting most of the kills
- Whether your weaker members can survive the later waves
- Whether alliance-wide points actually improve
If the new level causes widespread failures, going back one difficulty can be the smarter choice.
How Crazy Joe Scoring Works
Crazy Joe rewards you for killing Joe's troops.
You can score from:
- Defending your own city
- Reinforcing another alliance member
- Participating in HQ Waves 10 and 20
- Surviving the later, higher-value waves
This creates one of Crazy Joe's most important mechanics:
You usually do not want your best troops sitting at home.
If your own troops kill Joe before allied reinforcements get a chance to attack, your allies lose potential reinforcement points.
That is why organized alliances send most of their useful troops to other members before the event starts.
The Basic Reinforcement Swap
A simple setup looks like this:
Player A reinforces Player B
Player B reinforces Player A
Both cities still receive troops, but now each player can gain reinforcement points from another city instead of relying entirely on home defense.
With several march queues available, you can spread your troops across multiple alliance members and score from several cities.
Best Crazy Joe Strategy for More Points
The basic high-score strategy is:
Send your useful troops out → let allies defend your city → stay online → reposition for Waves 10 and 20 → keep moving marches when targets drop out.
Let's break that down.
1. Send Most of Your Troops Out
Before Crazy Joe begins, use your available marches to reinforce alliance members.
The goal is to leave as few high-contributing troops at home as possible without making your city too weak to survive.
At lower and mid Crazy Joe difficulties, Infantry are generally the first troops you want to send out, followed by Lancers if you still have march capacity.
Marksmen are often the easiest troops to leave home because Joe may already be dead before they get their attack turn.
This changes at high difficulty, which we'll cover later.
2. Reinforce Multiple Members
Don't put everything into one city.
Spread your marches between several alliance members so you can participate in more defenses.
Good reinforcement targets are usually players who:
- Are active during the event
- Can survive the full run
- Aren't already packed with reinforcements
- Are relatively close to you
- Have enough reinforcement capacity available
A very strong player is not always the best target.
If their own troops and several powerful reinforcements kill Joe instantly, your march may barely contribute.
Sometimes reinforcing a mid-power player produces better results because your troops get a larger share of the kills.
3. Check Battle Reports
Crazy Joe battle reports are more useful than they look.
Look at which troop type is actually recording kills.
If you see:
- Infantry taking almost every kill → you may not need many Marksmen in normal city reinforcement.
- Lancers beginning to score heavily → the difficulty is high enough that Joe survives longer.
- Marksmen getting substantial kills → your alliance has reached the point where old Infantry-only advice is no longer optimal.
This becomes particularly important at Difficulty 20+.
Your reports are more reliable than blindly copying one universal troop ratio from another State.
Waves 7, 14 and 17: Stay Online
Waves 7, 14 and 17 are special because Joe targets only a selection of online alliance members rather than attacking everyone normally.
These waves can be very valuable for reinforcement scoring.
If you're online and selected as a target, both you and the players reinforcing you have another opportunity to score.
If you're not attacked, look for members who are and reinforce them when possible.
For alliances trying to maximize Crazy Joe points, R4/R5 should remind members to remain online around:
Wave 7 → Wave 14 → Wave 17
This is especially useful if your alliance has several members who normally log off after sending their troops out.
Waves 10 and 20: How Alliance HQ Works
Crazy Joe changes targets completely during Waves 10 and 20.
Instead of attacking individual cities, Joe attacks the Alliance HQ.
These waves require a different formation and much more coordination.
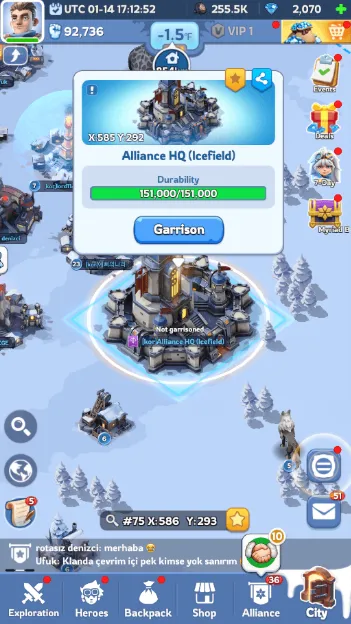
Wave 10
Wave 10 is normally the easier HQ attack.
After the Wave 9 attack reaches the city you are reinforcing, recall the march assigned to HQ and send it to the Alliance Headquarters.
Don't recall too early.
If Wave 9 is still marching toward your reinforcement target and you pull your troops out, you give up points unnecessarily.
Once Wave 10 is finished, recall the HQ march and send it back to another member.
Do not leave troops sitting in HQ until Wave 20.
There are another nine city waves where those troops can earn points.
Wave 20
After Wave 19 lands, prepare your HQ march again.
Wave 20 is much stronger than Wave 10 and becomes one of the biggest challenges at high Crazy Joe difficulty.
This is where many older Crazy Joe strategies stop working.
Best Troops for Crazy Joe
There is no single troop ratio that remains optimal from Difficulty 1 all the way through Difficulty 31.
The most useful way to think about troops is by how long Joe survives.
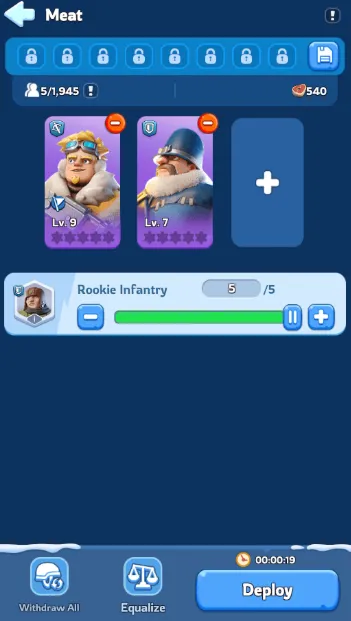
Lower Difficulty: Infantry Dominates
When your troops massively overpower Joe, Infantry attacks first and often kills most of the enemy before Lancers or Marksmen get much opportunity to contribute.
That is why older Crazy Joe guides commonly recommend:
Send Infantry out → keep Marksmen at home.
For normal city reinforcement at easier difficulties, that advice still works reasonably well.
Higher Difficulty: Lancers and Marksmen Matter More
Once Joe becomes strong enough to survive the opening attacks, later troop types start contributing.
This is why alliances at Difficulty 25–31 increasingly report meaningful kills from Lancers and Marksmen.
At that stage, blindly sending only Infantry can reduce your efficiency—especially for HQ Wave 20.
Your alliance should review battle reports after each new Crazy Joe difficulty and adjust accordingly.
Best Troop Ratio for HQ Waves 10 and 20
This is probably the most debated part of Crazy Joe.
You may see alliances using:
- 100% Infantry
- 60% Infantry / 40% Lancer
- 50% Infantry / 50% Lancer
- 100% Marksmen
- 10% Infantry / 10% Lancer / 80% Marksmen
- Other custom ratios
They can all appear "correct" because they are being used at different Crazy Joe difficulties and different alliance power levels.
Wave 10
For most alliances, Wave 10 is not difficult enough to require extreme optimization.
An Infantry-heavy march can still work well.
What matters most is:
- Filling enough HQ capacity
- Using strong troops
- Avoiding random troop compositions
- Making sure all members follow the same alliance rule
Wave 20 at High Difficulty
Wave 20 is a different story.
At newer Crazy Joe difficulties, recent 2026 player testing increasingly favors Marksman-heavy or even 100% Marksman HQ formations, especially when an alliance is struggling to fully kill the Wave 20 army.
Why?
Because the Wave 20 enemy can survive long enough for Marksmen's damage to matter substantially.
At Difficulty 29–31, some alliances that previously relied on Infantry-heavy formations have switched toward:
0 / 0 / 100
or
10 / 10 / 80
for Infantry / Lancer / Marksman.
But don't copy those numbers blindly.
The best method is:
- Attempt Wave 20.
- Check the HQ battle report.
- See which troop type produces the kills.
- Adjust your next formation.
- Keep every alliance member on the same ratio if you want fairer point distribution.
If you already kill 100% of Joe's Wave 20 troops, changing the formation usually changes who gets the points more than it increases the total available score.
Why Everyone Should Use the Same HQ Ratio
Suppose 40 players send identical HQ marches, while one player ignores the instruction and sends a completely different composition.
That player may have a troop type that attacks earlier or performs better against the current Joe wave.
They can take a disproportionate number of kills—and therefore a disproportionate share of the available points.
That does not necessarily mean their formation is universally better.
It may simply mean their troops got more opportunities to attack.
For alliances that care about fair scoring, standardizing HQ troop ratios is more important than everyone inventing their own "best" march.
Best Heroes for Crazy Joe
Crazy Joe hero strategy is another area where old advice can be misleading.
Joe is technically attacking you, but the key mechanic is still killing his army within a limited combat window.
That means offensive rally-joiner skills can be more useful than defensive skills in many situations.
Reinforcing Member Cities
For regular city reinforcement, heroes with strong Expedition skills are useful.
The exact hero depends on your State's generation, but attack-focused rally joiners such as Jessie remain popular because their Expedition skill improves allied damage.
If you have multiple marches, distribute your useful Expedition heroes rather than stacking every good hero into one march.
Not sure which heroes are worth investing in overall? Our Whiteout Survival Hero Tier List 2026 compares heroes across generations and different combat roles.
HQ Waves
For higher-level Wave 20 defenses, organized alliances increasingly use:
- Their strongest player as HQ garrison leader
- Strong garrison heroes with useful attack/lethality bonuses
- Attack-oriented rally joiners
- Marksman-heavy formations
The exact garrison leader lineup changes with Hero Generation, so there is no reason to force an old Gen 1–3 lineup onto a Gen 6+ State.
Is Patrick Good for Crazy Joe?
Patrick appears in many older Crazy Joe setups because players treat the event as pure defense.
At higher difficulties, though, many experienced alliances now favor attack-focused joiners such as Jessie for HQ Wave 20 because the real goal is to kill Joe's army before the combat window ends. Recent 2026 high-difficulty discussions repeatedly favor this approach.
That doesn't make Patrick unusable everywhere.
It simply means "always send Patrick because Crazy Joe is defense" is no longer a good universal rule.
Should You Keep Your Strongest Heroes at Home?
For your own city, keeping a strong defensive hero lineup on the Barricade can help prevent your city from failing twice.
Your reinforcing troops do not need every top hero you own.
A sensible approach is:
- Keep enough strong heroes home to protect your city.
- Use useful Expedition heroes as reinforcement leaders.
- Prioritize your best garrison leader for HQ if your alliance assigns you that role.
The exact balance depends on how strong your city is relative to the selected difficulty.
What Happens If Your City Burns Twice?
After failing two Crazy Joe waves, your city will no longer be targeted during that run.
But do not stop playing.
Your remaining marches can still reinforce alliance members who are receiving attacks.
In fact, once you know your city is out, every available useful troop should be sent somewhere else.
Check which alliance members are still alive and move your reinforcements there.
Should You Heal During Crazy Joe?
Usually, avoid unnecessary healing while the event is still running.
When you heal troops, they return to your city.
If you are intentionally keeping your city light so alliance reinforcements can get more kills, suddenly adding a large batch of healed troops can interfere with that setup.
If you accidentally heal, simply send the recovered troops out again if you have an available march.
Do your main healing session after Wave 20.
Do Shields Work During Crazy Joe?
No.
Shields do not protect your city from Crazy Joe attacks.
The good news is that Crazy Joe is an event battle, so a defeat does not work like a normal PvP city attack. You do not lose regular resources just because Joe defeats your defense.
That means there is no reason to waste a shield specifically for this event.
Best Crazy Joe Strategy for Alliance Leaders
For R4 and R5, Crazy Joe is much easier when everyone receives simple instructions before the event.
A practical alliance plan looks like this:
Before the Event
Assign members to reinforcement targets.
Tell everyone:
Send troops out. Keep your city light. Stay online. Follow HQ instructions exactly.
Choose a Crazy Joe difficulty that your alliance can realistically clear.
Waves 1–9
Keep normal reinforcements active.
Monitor failed cities and move troops away from players who have already failed twice.
Wave 10
Have members recall the designated HQ march only after Wave 9 lands.
Use the alliance's standardized HQ ratio.
Waves 11–19
Send HQ troops back out to member cities.
Stay online for Waves 14 and 17.
Wave 20
Recall the designated HQ march after Wave 19.
Use your high-difficulty Wave 20 formation.
If your alliance is progressing into Difficulty 25+, start checking the report carefully instead of repeating the same old Infantry setup forever.
Crazy Joe Beginner Strategy
If your alliance is new to Crazy Joe, don't overcomplicate it.
Your first goal should be learning the rhythm:
Reinforce members → stay online → HQ on 10 → reinforce members again → HQ on 20.
You do not need to optimize every percentage point immediately.
A beginner alliance should focus on:
- Surviving all 20 waves
- Preventing members from failing twice
- Learning HQ timing
- Sending troops out instead of keeping everything home
- Choosing a reasonable difficulty
Once the alliance can do those things consistently, start optimizing formations.
Crazy Joe Advanced Strategy for Difficulty 25–31
High-level Crazy Joe needs a different mindset.
At this point, troop type and stats can decide whether HQ Wave 20 succeeds at all.
Stop Following Old Infantry-Only Rules Blindly
Infantry-heavy formations became popular when Crazy Joe was weaker.
At Difficulty 25+, especially approaching 30–31, check whether your Marksmen are now responsible for a substantial amount of damage.
If they are, adapt.
Use Your Strongest HQ Captain
Your best HQ garrison leader should generally be one of the strongest players available, with strong:
- Chief Gear
- Chief Charms
- Hero stats
- Hero widgets
- Research
- Pet bonuses
- Attack and lethality stats
If your alliance is struggling with Wave 20 despite a good troop ratio, the issue may be raw garrison strength rather than the formation itself.
Use Relevant Buffs for Progression Attempts
If your alliance is trying to clear a new maximum difficulty rather than simply farm an easy run, your HQ captain can consider activating available combat bonuses before the final wave.
The benefit matters more when your alliance is narrowly missing the required kills.
Review Every Failed Wave 20
Don't just say "we need more power."
Check:
- Kill breakdown by troop type
- Which heroes were used
- Garrison leader stats
- Whether members followed the correct troop ratio
- Whether low-tier troops filled too much HQ capacity
A single report can tell you much more than another generic Crazy Joe guide.
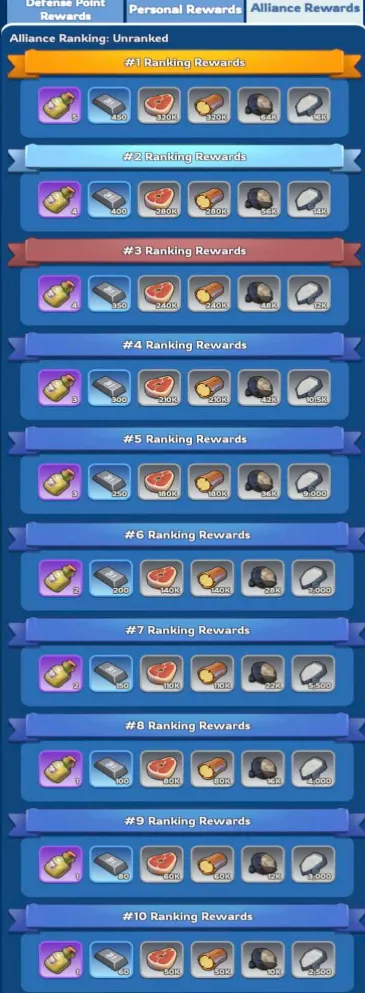
Crazy Joe Rewards
Crazy Joe is particularly valuable because it provides materials used for Chief Gear progression.
Important rewards can include materials such as:
- Hardened Alloy
- Polishing Solution
- Design Plans
- Other progression resources depending on your score and event level
For F2P and low-spending players, that makes Crazy Joe worth participating in even if you are not chasing the leaderboard.
Chief Gear eventually consumes a large amount of these materials, so skipping recurring free sources slows your account down over time.
If you're unsure which gear piece to upgrade first or when to save your materials, our Whiteout Survival Chief Gear Guide 2026 covers the recommended upgrade order and material sources.
Common Crazy Joe Mistakes
Keeping All Your Troops at Home
This wastes reinforcement scoring opportunities.
Better: Send your troops to other alliance members.
Using the Same HQ Formation at Every Difficulty
A ratio that dominates Difficulty 15 may fail at Difficulty 30.
Better: Read battle reports and adjust as Joe becomes stronger.
Leaving HQ Troops There After Wave 10
You're giving up scoring opportunities from Waves 11–19.
Better: Return them to member cities immediately.
Going Offline Before Waves 7, 14 and 17
You reduce the number of valuable elite-wave targets available to your alliance.
Better: Stay online whenever possible.
Reinforcing a Player Who Already Failed Twice
That march can no longer earn city-defense points there.
Better: Move it to someone who is still being attacked.
Recalling Before the Previous Wave Lands
This can throw away an entire wave of reinforcement points.
Better: Confirm the battle has finished first.
Assuming "Defense Event" Means Defensive Heroes Are Always Best
Crazy Joe is largely a race to kill the enemy within a limited number of attack turns.
Better: At high difficulty, test attack-focused joiners and compare the reports.
Crazy Joe Quick Checklist
Before the event:
- Free up your march queues.
- Decide who you will reinforce.
- Send most useful troops out.
- Keep enough strength home to avoid two failures.
- Check the alliance's required HQ ratio.
- Make sure you know the selected difficulty.
During the event:
- Stay online for Waves 7, 14 and 17.
- Watch whether your reinforcement targets fail twice.
- Move marches when necessary.
- Prepare HQ after Wave 9.
- Return to city reinforcement after Wave 10.
- Prepare HQ again after Wave 19.
- Avoid unnecessary healing.
After Wave 20:
- Recall your troops.
- Heal wounded units.
- Check your battle reports.
- Compare Infantry, Lancer and Marksman kills.
- Adjust the strategy before the next Crazy Joe run.
Crazy Joe FAQ
How Many Waves Are There in Crazy Joe?
Crazy Joe has 20 waves in every run.
Waves 10 and 20 target the Alliance HQ, while the other waves primarily attack alliance member cities.
What Are the Special Waves in Crazy Joe?
Waves 7, 14 and 17 focus on selected online players.
Waves 10 and 20 attack the Alliance HQ.
What Is the Max Crazy Joe Difficulty?
Older guides may still show 21 difficulties, but newer States have access to expanded Crazy Joe difficulties up to Level 31.
Because the higher levels are much stronger, older troop strategies may no longer work there.
What Happens If I Lose Twice?
After your city fails twice, Crazy Joe stops targeting your city.
You can still earn points by reinforcing other alliance members.
What Are the Best Troops for Crazy Joe?
For normal city reinforcement at lower difficulties, Infantry usually performs very well because they attack first.
At higher difficulties, Lancers and Marksmen become more relevant because the enemy survives longer.
For high-difficulty HQ Wave 20, many alliances now use Marksman-heavy formations.
Should I Use 100% Marksmen for Wave 20?
It can be highly effective at higher Crazy Joe difficulties, and some Difficulty 29–31 alliances use 100% Marksmen successfully.
But it is not automatically the best setup for every alliance.
Use your HQ battle reports to determine which troop type is actually securing kills.
What Is the Best Hero for Crazy Joe?
There is no single best hero for every State generation.
For reinforcement and high-difficulty HQ defense, prioritize heroes whose Expedition skills improve useful combat stats such as attack and lethality.
Jessie remains a popular rally joiner because of her Expedition buff.
Is Crazy Joe Worth Doing for F2P Players?
Yes.
Crazy Joe is a recurring source of Chief Gear materials, so participating consistently can reduce the amount of paid progression you need over time.
Conclusion
The best Whiteout Survival Crazy Joe strategy is no longer as simple as "send Infantry and forget about it."
For most players, the core rules remain easy: send troops to allies, stay online for Waves 7/14/17, move to HQ on Waves 10 and 20, and keep reinforcing even if your own city drops out.
But once your alliance reaches the newer high difficulties, especially Difficulty 25–31, start paying much more attention to battle reports. Joe survives longer, Marksmen become increasingly important, and an outdated HQ formation can be the difference between clearing Wave 20 and watching the Headquarters burn.
Crazy Joe rewards coordination more than individual improvisation. Get everyone using the same plan, adjust the troop ratio as the difficulty increases, and your alliance will earn far more from every run.