

Foundry Battle is one of the most coordination-heavy alliance events in Whiteout Survival. Raw power matters, but the winner is decided by Alliance Arsenal Points—not by total kills. The strongest alliances turn combat power into building control, fast rotations, efficient rallies, Arsenal Supply collection and clear role assignments. Here is all you need to konw!


Applicable Buff List
Many combat bonuses remain active inside Foundry Battle, but not every map-related bonus applies. Use the list below as a quick pre-battle checklist.
Compare regular in-game prices with current Mone prices to find the right WOS pack for your budget. The popular $4.99 pack currently offers the largest discount. Prices and discounts may change. The current price is always shown on the product page and again before payment.
|
Buff Source |
Works in Foundry? |
Notes |
|
City Bonus / War Buffs |
Yes |
Active |
|
Deployment Capacity Buffs |
Yes |
Active |
|
Pet Skills |
Yes |
Active |
|
Daybreak Island |
Yes |
Always applicable |
|
President Skills |
Yes |
Forced Exile and State Search do not work |
|
Minister Buff |
Yes |
Active |
|
Territory Bonuses |
No |
Inactive |
|
Facility Buff |
Yes |
Combat-related bonuses apply |
|
March Accelerator |
Yes |
Active |
|
Frostdragon Tyrant Titles |
Yes |
Active |
|
Frost Sphere Domain Bonus |
Yes |
Active |
For rally leaders and key garrison players, prioritize useful combat boosts such as Attack, Lethality, Health, Defense, Deployment Capacity, combat Pet Skills and march-related bonuses.

What Is Foundry Battle in Whiteout Survival?
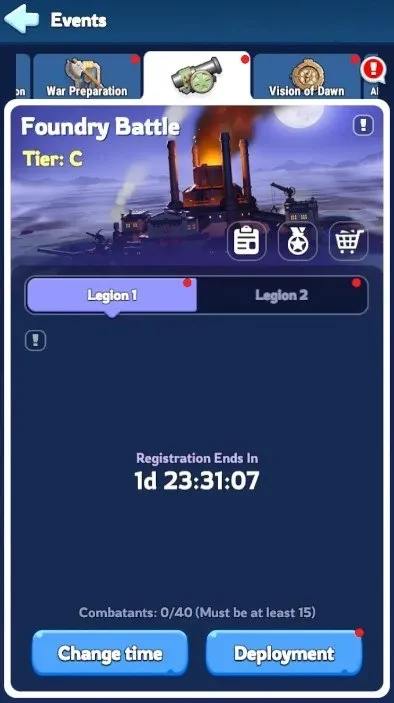
Foundry Battle is a one-hour alliance-versus-alliance battlefield built around capturing and holding structures. Your alliance earns points from first control, continuous occupation, Arsenal Supplies, Weapon Workshops and personal combat activity.
The match is not a simple PvP brawl. A player can post a huge personal score while the alliance still loses if the other side controls more high-value structures and collects more battlefield resources.
Troop losses inside Foundry Battle do not permanently remove troops from your normal army, which makes the event ideal for coordinated rallies, aggressive garrisons and repeated objective fights.
Pre-Battle Preparation and Matchmaking
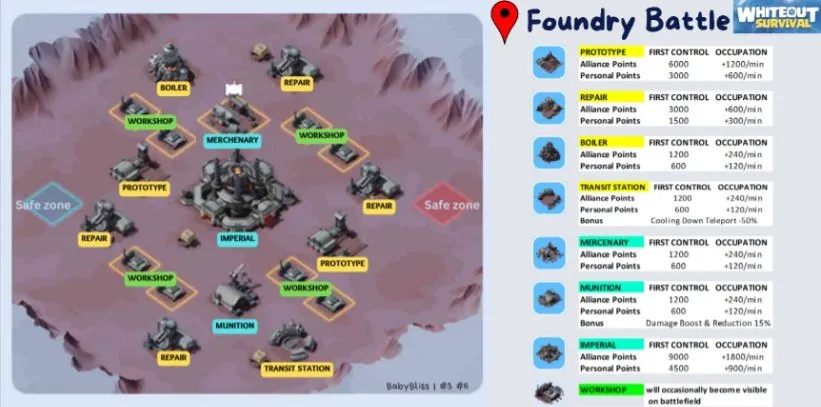
Good Foundry performance starts before the battlefield opens. Make sure registered players are actually available for the selected battle time, and confirm that troops are not busy gathering, scouting, marching or garrisoning when entry opens.
Why Attendance Matters in Matchmaking
Substitutes can affect matchmaking. The system considers the Troop Power of the top 20 Chiefs among registered combatants and substitutes. That means adding a very strong account that will not actually attend can make the matchup harder without adding usable battlefield strength. The best roster is not the highest-power roster on paper. It is the strongest roster that will actually show up.
Quick Pre-Battle Checklist
Confirm the final 30 combatants and substitutes.
Remove clearly unavailable high-power players from the roster when possible.
Activate applicable combat and deployment buffs before entry.
Recall gathering marches and finish active troop movements.
Assign rally leaders, garrison leaders, side teams and mobile collectors in advance.
Agree on a simple voice/chat command system for target calls and rotations.
Foundry Battle Map, Buildings and Point Values
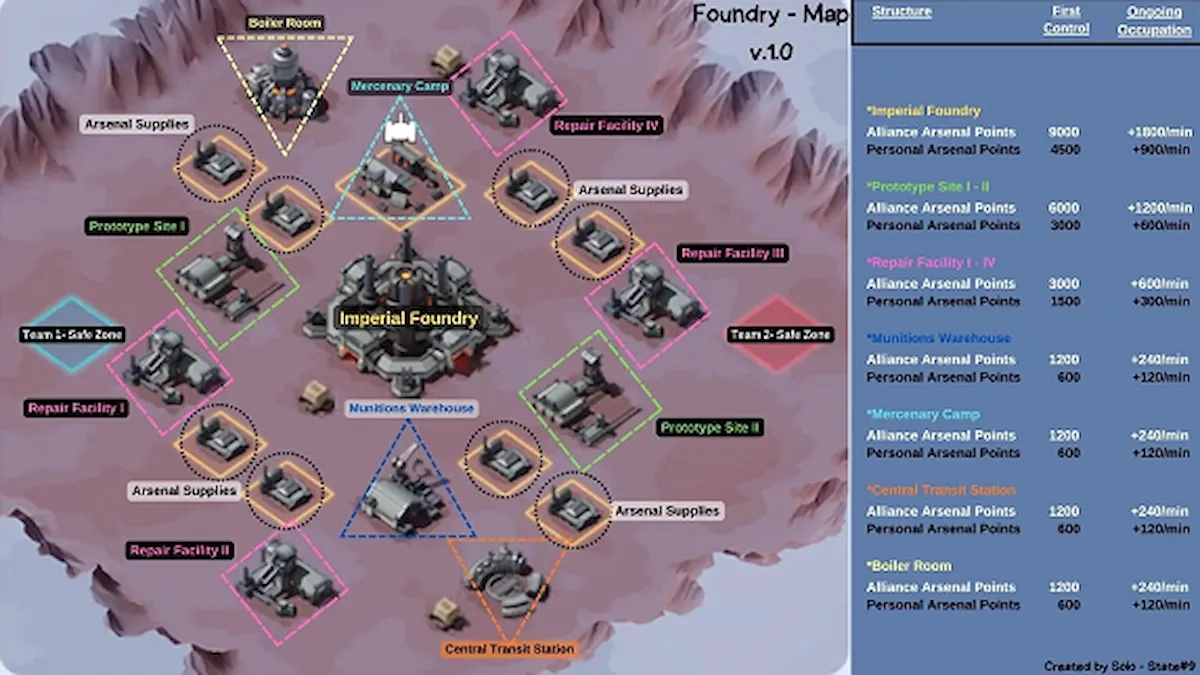
Every capturable structure has a different scoring value and battlefield purpose. High-value buildings decide the score, while utility buildings can decide how quickly your alliance moves and fights.
|
Building |
First Control |
Points / Min. |
Main Value |
|
Imperial Foundry |
9,000 |
1,800 |
Highest-value single objective |
|
Prototype Site ×2 |
6,000 each |
1,200 each |
Major early scoring objectives |
|
Repair Facility ×4 |
3,000 each |
600 each |
Reliable outer-map scoring |
|
Boiler Room |
1,200 |
240 |
Reduces building control time by 50% |
|
Transit Station |
1,200 |
240 |
Reduces teleport cooldown by 50% |
|
Munitions Warehouse |
1,200 |
240 |
Provides a combat advantage |
|
Mercenary Camp |
1,200 |
240 |
Enables mercenary pressure on buildings |
Holding all 11 main objectives produces 7,560 points per minute, with 37,800 total first-control points available across the map. In raw scoring value, the order is Imperial Foundry → Prototype Sites → Repair Facilities → utility buildings.
Do not treat utility buildings as low priority just because their direct points are smaller. The Transit Station, for example, can improve the speed of every major rotation your alliance makes.
Best Foundry Battle Strategy by Phase
Foundry Battle changes as new objectives unlock. Strong teams change their priorities by phase instead of using the same plan for the entire hour.
Phase 1
0–15 Minutes — Secure Prototype Sites Early
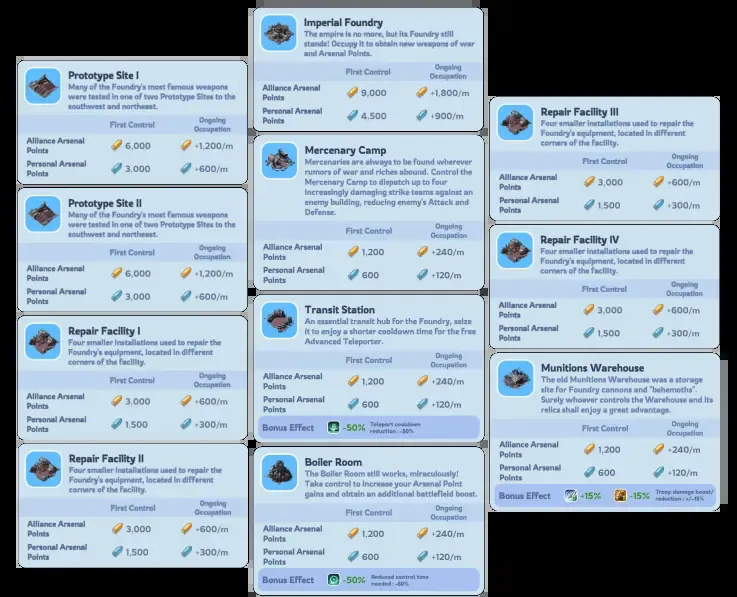
At the start, focus on the two Prototype Sites, four Repair Facilities, Boiler Room and Transit Station. The objective is to build a scoring lead and establish mobility before the Imperial Foundry opens.
Split the alliance instead of stacking everyone on one building.
Send strong teams to the two Prototype Sites.
Use a mobile squad to contest the Transit Station.
Use remaining players to secure the Boiler Room and nearby Repair Facilities.
Reinforce captured structures immediately after control completes.
Each Prototype Site generates 1,200 points per minute, so holding both creates a 2,400-point-per-minute base before the center even opens.
Phase 2
15–30 Minutes — Fight for the Imperial Foundry

At 15 minutes, the Imperial Foundry, Munitions Warehouse and Mercenary Camp become available. The Imperial Foundry becomes the single biggest prize on the map, but the most common mistake is sending the entire alliance to the center.
Use your main rally group to contest the Imperial Foundry while secondary teams keep Prototype Sites and Repair Facilities. If the enemy commits too heavily to the center, punish them by maintaining control of the outer map.
A successful attack is only half the job. Fill the garrison immediately after taking a building so the opponent cannot reclaim it with a quick counterattack.
Phase 3
30–60 Minutes — Weapon Workshops and Arsenal Supplies
The final 30 minutes add more opportunities to score through Weapon Workshops and dropped Arsenal Supplies. This is where mid- and lower-power players can have a huge impact without fighting the strongest enemy accounts directly.
High-power players should focus on:
Imperial Foundry
Prototype Sites
Major enemy rally leaders
Critical rallies and garrisons
Mid- and lower-power players should focus on:
Weapon Workshops
Arsenal Supply drops
Empty or lightly defended buildings
Reinforcing key structures
Fast rotations to unattended scoring opportunities
Do not keep every player trapped in the center fight. If both main forces are concentrated on one objective, the rest of the map becomes a scoring opportunity.
How Foundry Battle Arsenal Points Work
First-Control Points
The first time your alliance fully captures a structure, you receive a one-time point bonus. This makes the opening fight after a new building unlocks especially valuable.
Continuous Occupation Points
Controlled buildings keep generating points every minute. Capturing a building matters, but holding it matters more. For example, holding one Prototype Site for 10 minutes produces 12,000 points from continuous control alone.
Temporary Points and Arsenal Supplies
When a long-held structure changes hands, temporary Arsenal Points can appear around the building as collectible Arsenal Supplies. Mobile players should be ready before a key structure falls so they can grab the drop immediately. Winning the building is valuable. Winning the building and collecting the dropped points is much better.
Personal PvP Points
PvP activity can raise your Personal Arsenal Points, but personal scoring does not replace Alliance Arsenal Points. Do not sacrifice a high-value objective simply to chase kills.
Best Foundry Battle Team Setup
A coordinated roster is much stronger than 30 players choosing targets independently. A simple role structure keeps the battlefield organized.
Main Rally Group
Use your strongest rally leaders and combat players for the Imperial Foundry, heavily defended Prototype Sites and decisive objective fights.
Left and Right Objective Teams
These teams protect Prototype Sites and Repair Facilities so the alliance does not lose the outer map while the main group fights in the center.
Mobile Reinforcement Team
Use mobile players to reinforce threatened structures, fill garrisons, capture empty objectives and respond to Arsenal Supply drops.
Workshop and Supply Collectors
Players who cannot reliably fight the strongest enemy accounts should focus on Weapon Workshops, Arsenal Supplies and open buildings. A lower-power Chief who consistently collects points can contribute more to victory than a stronger player who spends the match chasing kills.
Transit Station, Rallies and Battlefield Mobility
The Transit Station is one of the most valuable utility objectives because it reduces teleport cooldown by 50%. That advantage affects every rotation: reinforcing a garrison, moving to the Imperial Foundry, contesting a side building or collecting a sudden point drop.
Against strongly defended objectives, coordinated rallies are usually more efficient than endless solo attacks. Time the rally, prepare follow-up marches, then reinforce immediately after control changes.
A useful rotation pattern is: capture → reinforce → teleport → support the next objective → collect nearby supplies → reposition again.
Healing and the 12-Minute Return Mechanic
If most of your useful troops are injured, leaving the battlefield can let you recover—but you must wait 12 minutes before returning. In a 60-minute battle, that is a major opportunity cost.
Consider leaving to recover when:
Most of your main fighting force is already unusable.
Your alliance currently has stable map control.
There is enough time before the next decisive objective fight.
The match is still in the early or middle stage.
Avoid leaving in the final 10–15 minutes unless you have almost no useful troops left. A late exit can remove you from the entire final scoring window.
Foundry Battle Rewards
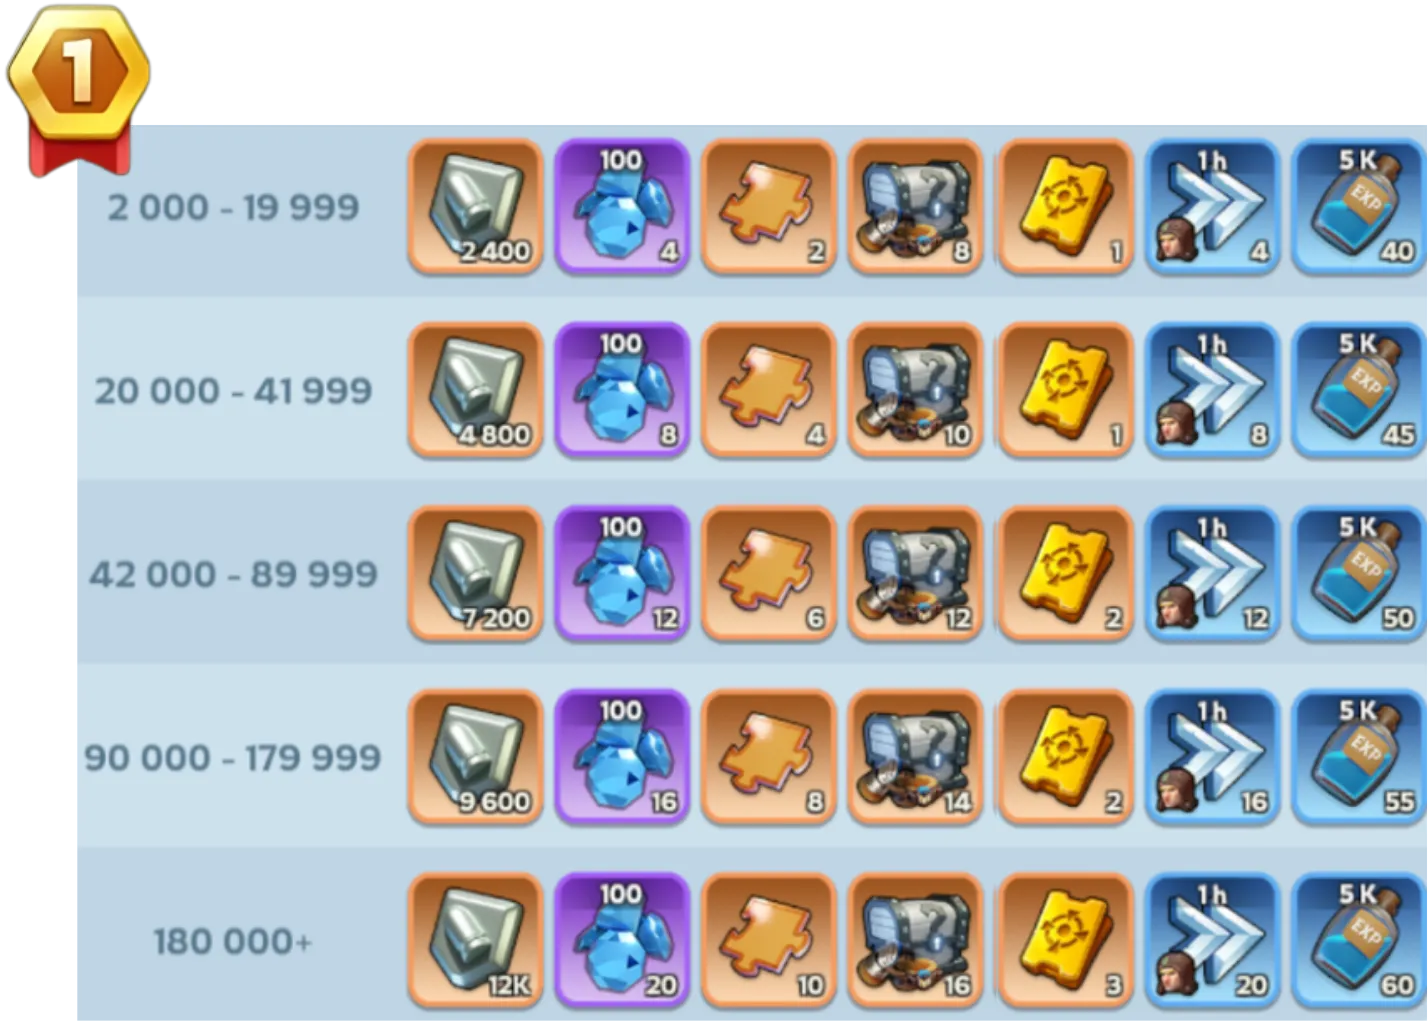
Foundry Battle rewards are tied to both alliance performance and personal activity. Winning is based on Alliance Arsenal Points, while players can improve personal rewards through meaningful participation in objectives and combat.
The Foundry Shop refreshes on a 14-day cycle, so regular participation remains valuable even when your alliance does not win every matchup.
Foundry Battle Mistakes to Avoid
Sending everyone to the Imperial Foundry. The center is the highest-value single building, but it is not the entire map.
Chasing kills instead of watching the score. Personal points do not automatically translate into alliance victory.
Ignoring Prototype Sites. Two Prototype Sites together generate 2,400 points per minute.
Ignoring the Transit Station. The 50% teleport cooldown reduction can influence rotations throughout the whole match.
Letting lower-power players fight unwinnable battles. Workshops, reinforcements and supply collection often create more value.
Missing Arsenal Supply drops. A long-held building can release valuable temporary points when control changes.
Leaving the battlefield too late. A 12-minute return timer can make you miss the final scoring push.
Whiteout Survival Foundry Battle FAQ
How long does Foundry Battle last?
Each battle lasts 60 minutes.
How many players can register?
An alliance can register up to 30 combatants and 10 substitutes.
Do substitutes affect matchmaking?
Yes. Matchmaking considers the top 20 Troop Power values among registered combatants and substitutes.
What is the most valuable building?
The Imperial Foundry has the highest single-building scoring value, while Prototype Sites are crucial long-term scoring objectives.
Which utility buildings matter most?
The Transit Station and Boiler Room are especially useful because they improve mobility and building-control speed.
What should lower-power players do?
Prioritize Weapon Workshops, Arsenal Supplies, reinforcement, open objectives and map rotations.
Do troops permanently die in Foundry Battle?
No. Battlefield troop losses do not permanently reduce your normal army.
How long does it take to re-enter after leaving?
You must wait 12 minutes before returning.
Conclusion
The best Whiteout Survival Foundry Battle strategy is not to stack every powerful player at the Imperial Foundry. The strongest alliances convert combat power into map control, building uptime, fast rotations and Alliance Arsenal Points.
Control Prototype Sites and utility buildings early, contest the Imperial Foundry without abandoning the outer map, then use the final 30 minutes to combine high-power objective fighting with aggressive Weapon Workshop and Arsenal Supply collection.